This weekend (13-14.3) two of my friends (Gal Weinstock and Maxim Altshul) and I participated in the BrainiHack 2015 event hosted at the AutoDesk offices in Israel.
BrainiHack is a neuroscience themed Hack-A-Thon, where makers come to compete in a day-and-a-half long neuroscience-related project building marathon.
My group is called Blue GSD, we are two Communication Systems Engineering students and a Computer Science student. we came with absolutely no background in Neuroscience and tried to make something awesome. We brought an arsenal of tools, electronic components and a home-built 3D Printer.
We ended up winning the special OpenBCI prize for the best project in the open source category. The prize was an OpenBCI Starter Kit valued at 500USD.
Our project is a Labyrinth game controlled via brain waves (EEG). We are using OpenBCI, an arduino based open source bio-sensing microcontroller, It’s brilliant and with some initial assistance from Conor, one of the founders of OpenBCI, it’s really easy to work with.
The Labyrinth
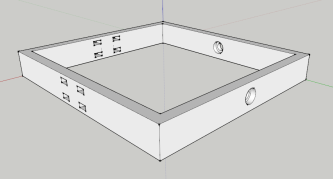
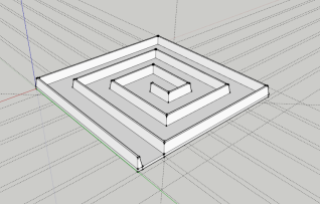
The game itself was entirely 3D printed, it’s movement is provided via two micro servo motors controlled with an Arduino Uno.
The mechanism consists of three nested frames that are anchored in different places to achieve two degrees of freedom – roll and pitch.
We had no time for strong glue and I didn’t want to make any permanent connections (I’m designing on the fly so a lot can go wrong, and some did) so my design had to be zip tie friendly, the motors and motor arms are all attached with zip ties to the frames. The hinges are M3x16 screws and nuts with some washers to keep the frames in place relative to each other and press them onto the motor.
In the end we noticed we didn’t have enough clearance under the device for the frames to move all the way and we had no time to print another outer frame, so we had to make lifters for the legs which actually worked out perfectly.
Models for all 3D printed parts can be downloaded free at Thingiverse.com
OpenBCI
As mentioned before, OpenBCI is an open source EEG device (and more, but that’s not relevant right now, I might explore more of it’s capabilities in the future) which was handed out to whoever wanted to use it.
With OpenBCI we could attach electrodes wherever we wanted (as opposed to some of the other fixed position alternatives), that way we could experiment with different methods and brain waves and choose the ones that work for us.
Conor from OpenBCI was kind enough to give us a little guidance and showed us another project done with OpenBCI, a five-person controlled shark balloon by chip, from which we learnt a lot about the system.
In addition to all of its advantages, it’s Wireless! It includes an RFduino that transmits the data to a dedicated USB dongle that plugs into the computer.
Brain Waves
We wanted to explore more than one type of brain waves. The shark balloon project was based purely on Alpha waves, a 7.5-12.5Hz wave our brain produces in the Occipital Lobe when we close our eyes and relax, that’s neat but we wanted more. Alpha waves are very easy to detect but there’s only one type of Alpha wave per person, this means that in order to control 2 axis we would need 4 people or 2 if we use direction toggling (more on that next).
After some research we found out about SSVEP (Steady State Visually Evoked Potential), a phenomenon where the brain produces a frequency (and/or harmonies of a frequency) that matches the frequency that excites the retina. This means that if we look at a light that blinks at a constant frequency, the brain will produce the same frequency. After some experimentation, we found that the range 5Hz-20Hz was easiest to detect and that 16Hz was far enough from the Alpha waves so they don’t get mixed up.
By combining Alpha and SSVEP we have 2 types of waves we can control and anticipate, which gives us the ability to control the game with just one person.
Controlling the Game
The problem with this technology is that it’s very slow, it’s not real-time by any standard. It may take a few seconds for the wave to generate and be detected while the Labyrinth game requires finesse and delicate movements to balance the ball, this is impossible with 2 or 3 second delay between reaction and actual movement of the platform.
To overcome this challenge we decided to simplify the game, instead of continuous control of the position of the platform, each axis would only be fully tilted to one side or the other, for this to work we created a super-simple maze layout, no holes, no balancing, just walls with straight angles.
As mentioned, we wanted to control the whole thing with one person and we had two different signals we could extract. Left-right position toggle was controlled via Alpha wave and up-down position toggle was controlled via SSVEP.
Data Analysis and Translation
OpenBCI provides a neat GUI that allows you to visually see the data and analyse it more easily. The interface provides time-domain and frequency-domain (FFT) graphs as well as a map of the head with electrode activity.
Once the data is captured with OpenBCI, it is transferred to the computer for analysis, the computer runs a Processing program that computes the Fourier Transform of the signal over a defined interval of time, filters the spectrum to look at relevant frequencies and finds the most powerful frequency in the range. If the peaked frequency is the one we are looking for, a command is sent to an Arduino board via serial port. The Arduino then controls the servos according to the command received.
In our project, we were looking for peaks at around 10Hz (Alpha) and 16Hz (SSVEP) and had to ignore the very high peak at 50Hz that is caused by the AC power frequency here in Israel.
Code
The code running on the computer is a modified version of the shark baloon’s code. Since they already figured out the Alpha wave capturing and translation, we had to modify it for one person (they used 5) and add the SSVEP frequency capturing. The shark balloon code was taken and modified from another project (which modified the original code from OpenBCI) so it’s already a little messy and we probably made it messier (with a day and a half to get the whole thing to work we had no time to waste on making it pretty).
The code running on the Arduino is fairly simple, just a loop polling input and controlling the servos. We made the servo movement slow and continuous so that the ball doesn’t jump around.
The code will be uploaded to GitHub in a few days.
Special thanks to Conor over at OpenBCI for helping us and introducing us to the technology.


Its nice to see such innovating thoughts!
Keep us posted on future projects!
LikeLike